Change Your WordPress Table Prefix in Few Simple Steps
In this tutorial I will show you a step by step process how to change the default WordPress database table name prefix long after your WordPress Website has been online. This is known as "security through obscurity", in which by no means is, on its own, enough to secure your WordPress Website, but it is a one piece of an overall security strategy, as I discussed in my previous tutorial.
By default, WordPress table prefix is wp_, which will be the beginning of all WordPress table names stored in the MySQL database. Upon installing WordPress, you can easily change this by changing the $table_prefix value in your wp-config.php file and WordPress will do the rest. However, you need to do this step on your own since WordPress never alert you to provide a custom table prefix during installation. This is probably the main reason why the default prefix is widely assumed on many WordPress Websites.
Why is this necessary? Because many published WordPress specific SQL injection attacks make the assumption that the table prefix is still the default wp_. Changing it will block some SQL injection attacks, by making it much harder to guess your table names. Changing your database tables prefix protects against many automated attacks, especially used by script kiddies that target default table names. If the security structure of your database is compromised, then changing table names will be meaningless. It is like you lock the windows in your house but you leave the main door open.
This is what this section, taken from the wp-config-sample.php file, looks like:
/**
 * WordPress Database Table prefix.
 * You can have multiple installations in one database if you give each a unique
 * prefix. Only numbers, letters, and underscores please!
 */
$table_prefix  = 'wp_';
To change the database tables prefix long after installing and running your WordPress Website follow these simple 7 steps. Make sure to set aside about fifteen minutes of downtime for your Website. So you might need to do this during off-peak use.
Step1. Backup your Database
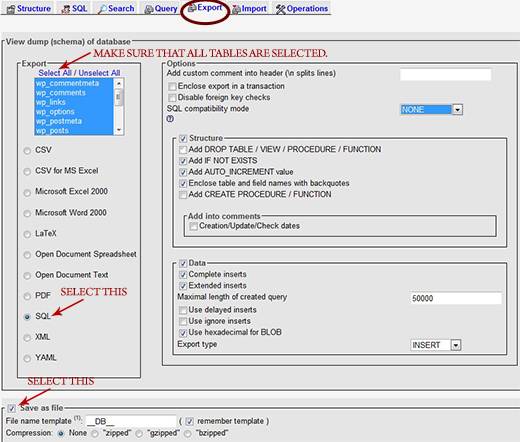
Create a backup copy of your WordPress database from your phpMyAdmin Web interface using the Export function. How to do that?
- Log into your phpMyAdmin and select your WordPress database.
- Click on the "Export" tab at the top.
- Follow the instructions as shown in the image below.
Step2. Change all your WordPress Table Names
In your phpMyAdmin and from your WordPress database, select the SQL tab and enter the following commands to rename all your 11 tables at once and click "GO". Depending on what plugins you installed, you might have more tables starting with “wp_” prefix, that need editing, make sure to rename all tables.
For instance, let´s say you want to replace wp_ with wpr12f_, then Run the following SQL commands as shown in the code and image below.
Rename table wp_commentmeta TO wpr12f_commentmeta;
Rename table wp_comments TO wpr12f_comments;
Rename table wp_links TO wpr12f_links;
Rename table wp_options TO wpr12f_options;
Rename table wp_postmeta TO wpr12f_postmeta;
Rename table wp_posts TO wpr12f_posts;
Rename table wp_terms TO wpr12f_terms;
Rename table wp_term_relationships TO wpr12f_term_relationships;
Rename table wp_term_taxonomy TO wpr12f_term_taxonomy;
Rename table wp_usermeta TO wpr12f_usermeta;
Rename table wp_users TO wpr12f_users;
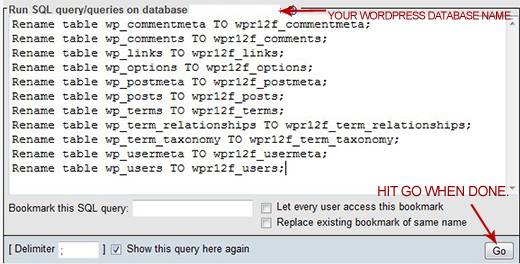
If you can´t see the new table names, either refresh the page or logout from phpMyAfmin and log back in.
In my case single quotes around table names cause syntax error. In your case you might need to add single quotes.
Step3. Edit the _options Table
Now search the wpr12f_options table for any instances of the old prefix (wp_). To do this, select the wpr12f_options table and click on the “Browse” tab. You will see all the records stored in that table. Search under the option_name field and change wp_user_roles along with any other records (starting with wp_) created by plugins, custom scripts, and probably others. Rename any options that begin with wp_ to the new prefix. You can change each record by clicking on the "Edit" pencil image for that record. Make sure not to miss any records.
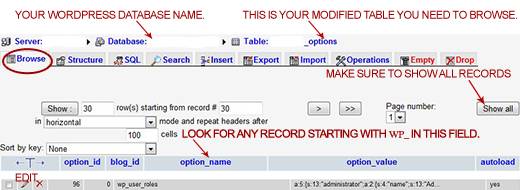
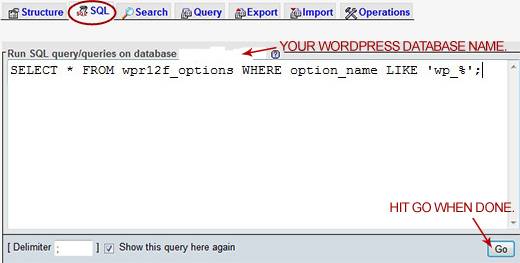
You can also execute a SQL command to find the records that need editing:
SELECT * FROM wpr12f_options WHERE option_name LIKE 'wp_%';See the image below:
Step4. Edit the _usermeta Table
Now do the same thing for the wpr12f_usermeta table, search for all instances of the old wp_ prefix. Select the wpr12f_usermeta table and then click on the “Browse” tab. Search under the meta_key field all records that start with the old wp_ prefix. Edit each record it by clicking on the "Edit" pencil image for that record. Make sure not to miss any records.

Do NOT edit any records starting with the prefix _wp_, but only records staring with the prefix wp_
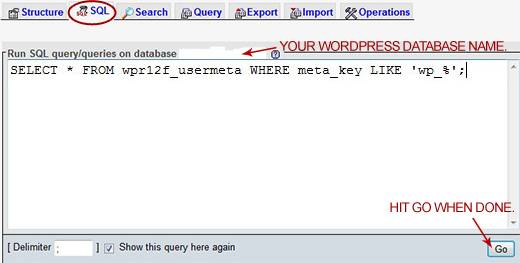
You can also execute a SQL command here to find the records that needs editing:
SELECT * FROM wpr12f_usermeta WHERE meta_key LIKE 'wp_%';See the image below:
Step5. Edit Your wp-config.php File
Now open your wp-config.php file and change your table prefix in from wp_ to whatever prefix you decide to use (wpr12f_ for this tutorial). Save and upload it to your server, as shown in the following code snippet:
/**
 * WordPress Database Table prefix.
 * You can have multiple installations in one database if you give each a unique
 * prefix. Only numbers, letters, and underscores please!
 */
//Rename the table prefix variable from the default 'wp_' to a new hard to
//guess and more secure prefix.
$table_prefix  = 'wpr12f_';
Step6. Test your WordPress Website
Now vigorously test your Website for proper functionality. Test your plugins, contact form, search field, posts, pages, comments, administration area, and anything else you can think of. If your Website is working as before, then the tables prefix change is a success.
Step7. Do Another Backup
Go ahead and do another backup of your database as a good and wise habit.
Conclusion
To emphasize again, changing the WordPress database table prefix helps in some automated scripts that target tables with the default prefix. This is one step in an overall security strategy for your Website. Automated scripts target the WordPress database using the default table prefix. Changing this to something else protects your Website against such attacks. However, if someone is able to access your database, it will not matter what you name your tables.
If you run into any problems or if things need to be done differently or any other ideas you have, don´t hesitate to comment.
Did you know! There are also plugins that change the table prefix, like WP Security Scan. But I haven´t tried it myself so I can´t vouch for it. Also it is safer to take the manual approach, because if you run into a problem you can back track your steps, which is not the case for a plugin.


Hello Boutros,
I experienced absolute disaster when I tried to change prefix of database tables. After got your article, recovered my site with 100 MB database. Thanks for your life saving guide and hats-off to you.
If you are starting from a fresh install, change the wp_ prefix to your custom prefix in wp_config.php file before installation. The install will complete as normal with your custom prefix. Super simple.
Agreed Tom.
For others to learn:
Variable name is ($table_prefix), on line 62 of the “wp-config-sample.php” file for the current WP version (3.3.1)
Here’s a handy script that’ll mostly automate the process of renaming your tables:
http://ruleant.blogspot.com/2009/03/rename-multiple-tables-in-mysql.html
Of course, don’t forget to do all the other steps listed in this article.
I also agree with you, Boutros, about global search and replace. It’s highly error prone.
Thanks Victor for sharing the script. I’ll try it out when I have to rename WP tables and see how it goes.
Boutros.
nice one… Im new at wordpress so I will try if its work… thanks…