Displaying “Related posts” is a popular feature and an excellent way to keep visitors longer on your WordPress blog and help them discover other related content. One way to keep them interested is to display a list of related posts; otherwise, they might just leave.
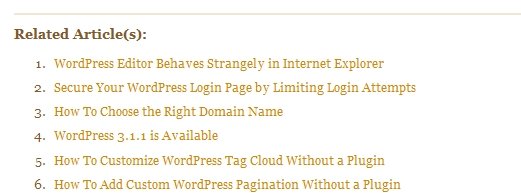
The picture below shows an example of Related Posts generated for this blog. This blog is using CODE BLOCK1 shown below. Browse the various posts of this blog, and at the bottom of every post see how the customized code behaves.
Yes, there are plugins for WordPress Related Posts, but haven´t you read my previous article about the disadvantages of unnecessarily adding plugins to your theme? Also what would you do if you want to develop a theme with a built-in Related Posts feature. Don´t you have the curiosity to know how things work?
Features of My “Related Posts” Code
The Related Posts code-snippets have the following features:
- You have the choice between 2 code-snippets: CODE BLOCK1 and CODE BLOCK2.
- CODE BLOCK1 displays related posts based on ALL common tags for the post and not just only for the first tag.
- CODE BLOCK2 displays related posts based on ALL common categories for the post.
- If a specific post does not have any related content, the Related Post(s): header will not be displayed.
- If a specific post does not have any tags assigned to it, the Related Post(s): will not be displayed.
- Related Posts are randomized. This means, each time the page is refreshed, a new set of related posts is displayed.
- The number and order of related posts to show are configurable.
WordPress “Related Posts” Code
Below are my two distinct versions of the WordPress Related Posts code. Open the single.php file located in your theme´s folder and add (copy and paste) the CODE BLOCK that you like. The code must be pasted within the loop and after the the_content() function.
CODE BLOCK1 – Displays Related Posts Based on ALL Common Tags
The code below displays related posts based on all common tags of the current post. It shows other posts that have common tags with the current post.
Note: If the vertical scroll bar is shown, you need to scroll all the way down to see the horizontal bar.
<?php

//Retrieve the list of tags for a post.
$tags = wp_get_post_tags($post->ID);

//If tags exist for the post.
if ($tags) {
    $tag_ids = array();
    //retrieve the tag_ids for the post.
    foreach($tags as $each_tag)
        $tag_ids[] = $each_tag->term_id;

    //WP_Query arguments.
    $args = array(
        'tag__in' => $tag_ids, //An array of tag IDs to be included.
        'post__not_in' => array($post->ID), //An array of post IDs to be excluded from the results.
        'orderby'=> 'rand', //Lists Related posts Randomly. *** MODIFY IF YOU LIKE ***
        'showposts' => 10, //*** MODIFY TO WHAT YOU LIKE.***  Number of related posts to show.
        //'caller_get_posts' => 1 //*** USE THIS IF YOU ARE RUNNING WordPress Version < 3.1 ***
        'ignore_sticky_posts' => 1 //*** USE THIS for WordPress Version >= 3.1 ***
    );

    //WP_Query is a class defined in wp-includes/query.php
    $query = new WP_Query($args);

    //If there are related posts.
    if( $query->have_posts() ) {
        echo '<div class="related">';
        echo '<h3>Related Article(s):</h3><ol>'; //*** MODIFY TITLE IF YOU LIKE ***

        //loop through the posts and list each until done.
        while ($query->have_posts()) {
            $query->the_post();
        ?>
            <li><a href="<?php the_permalink() ?>" rel="bookmark" title="Permanent Link to: <?php the_title_attribute(); ?>">
            <?php the_title(); ?></a></li>
        <?php
        }
        echo '</ol>';
        echo '</div>';
    }
}
//Destroy the previous query. This is a MUST, otherwise you will get the WRONG comments
//(comments assigned to the wrong post), and sometimes categories and tags are for the wrong post.
wp_reset_query();
?>
Notes about CODE BLOCK1:
- ´showposts´ on Line 26 is configurable.
- ´orderby´ on Line 25 is configurable. Here are your other choices:
- ‘date’ – Order by post date (Default).
- ‘author’ – Order by author.
- ‘title’ – Order by title.
- ‘modified’ – Order by modified date.
- ‘ID’ – Order by ID.
- As of WordPress : ´caller_get_posts´ WP_Query parameter is deprecated in favor of ´ignore_sticky_posts´ parameter. Therefore; if your WordPress Version is 3.0 or less use Line 27 ´caller_get_posts´ instead of Line 28. Even better, consider upgrading to the Latest version of WordPress.
Randomizing Related Posts: generates a random set of posts each time the page is refreshed. This is a nice way to break the monotone, but most importantly it gives the ability to show other posts that might otherwise be hidden. To explain further, Let´s say that you want to display only 10 related posts, but the code found 15 related posts. If you set ´orderby´ to anything other than ´rand´, then the related posts will always be the same first 10 and the other 5 will never show. But if you randomize, you will get some of the hidden posts.
CODE BLOCK2 – Displays Related Posts Based on ALL Common Categories
The code below generates Related posts via common category (or categories) assigned to the post. It displays other posts that have a common category with the current post.
Note: If the vertical scroll bar is shown, you need to scroll all the way down to see the horizontal bar.
<?php

//Retrieve the list of categories for a post.
$categories = get_the_category($post->ID);

//If categories exist for the post.
if ($categories) {
    $category_ids = array();

    //retrieve the category_ids for the post.
    foreach($categories as $each_category)
        $category_ids[] = $each_category->term_id;

    //WP_Query arguments.
    $args = array(
        'category__in' => $category_ids, //An array of category IDs to be included.
        'post__not_in' => array($post->ID), //An array of post IDs to be excluded from the results.
        'orderby'=> 'rand', //Lists Related posts Randomly. *** MODIFY IF YOU LIKE ***
        'showposts' => 10, //*** MODIFY TO WHAT YOU LIKE.***  Number of related posts to show.
        //'caller_get_posts' => 1 //*** USE THIS IF YOU ARE RUNNING WordPress Version < 3.1 ***
        'ignore_sticky_posts' => 1 //*** USE THIS for WordPress Version >= 3.1 ***
    );

//WP_Query is a class defined in wp-includes/query.php
$query = new WP_Query($args);

    //If there are related posts.
    if( $query->have_posts() ) {
        echo '<div class="related">';
        echo '<h3>Related Post(s):</h3><ol>'; //*** MODIFY TITLE IF YOU LIKE ***

        //loop through the posts and list each until done.
        while ($query->have_posts()) {
            $query->the_post();
        ?>
            <li><a href="<?php the_permalink() ?>" rel="bookmark" title="Permanent Link to: <?php the_title_attribute(); ?>">
            <?php the_title(); ?></a></li>
        <?php
        }
        echo '</ol>';
        echo '</div>';
    }
}
//Destroy the previous query. This is a MUST, otherwise you will get the WRONG comments
//(comments assigned to the wrong post), and sometimes categories and tags are for the wrong post.
wp_reset_query();
?>
Notes about CODE BLOCK2:
Same information as the Notes about CODE BLOCK1: above. Except that the line numbers are different.
What´s Next?
After you decide what CODE BLOCK you like to choose, copy and paste the CODE BLOCK above to your single.php file. This file is located in your theme´s folder. The CODE BLOCK must be pasted within the loop and after the the_content() function as shown below.
Sample of single.php file showing where the CODE BLOCK is placed:
<?php get_header(); ?>
<!-- part of the single.php code removed for brevity. -->
<?php if (have_posts()) : while (have_posts()) : the_post(); ?>
<div <?php post_class() ?> id="post-<?php the_ID(); ?>">
<div class="post_date">
<span class="day"><?php the_time('d') ?></span><br />
<span class="month"><?php the_time('M') ?></span><br />
<span class="year"><?php the_time('Y') ?></span>
</div>
<div class="post_content">
<h2><a href="<?php the_permalink() ?>" rel="bookmark" title="Permanent Link to <?php the_title_attribute(); ?>"><?php the_title(); ?></a></h2>
<div class="entry">
<?php the_content('Read the rest of this entry »'); ?>
<?php /*Added by BOUTROS ABICHEDID to split pages. */ wp_link_pages(array('before' => '<p><span class="strong">Pages:</span> ', 'after' => '</p>', 'next_or_number' => 'number')); ?>
</div>
<!-- **START** of Related Posts Code. PLACE CODE BLOCK1 or CODE BLOCK2 between the **START** and **END**-->
<!-- **END** of Related Posts Code -->
<!-- part of the single.php code was removed for brevity. -->
</div>
</div>
<div class="comments_content">
<?php comments_template(); ?>
</div>
<?php endwhile; else: ?>
<p id="rightcolumn" class="strong">Sorry, no posts matched your criteria.</p>
<?php endif; ?>
</div>
<?php get_sidebar(); ?>
<?php get_footer(); ?>
?>Styling “Related Posts” Section
Finally we need to style the Related Posts section with CSS. The following code is what I used to style the Related Posts section for this blog. The code should be added to your theme´s CSS file located in your theme´s folder (usually called style.css). Of course go ahead and change it to fit your blog design.
/* Styling Related Posts Section by BOUTROS ABICHEDID */
.related {
    padding:5px 0 10px 0;
    margin:30px 0 0 0;
    clear: both;
    border-top:2px solid #EFE7D1;
    border-bottom:0;
    border-left:0;
    border-right:0;
}
.related li{
    padding:0 0 5px 0;
}
Conclusion
You now have two choices of code-snippets for “Related Posts” that can be used on any WordPress blog and without the need of a plugin. If you have any questions or anything else to say, be sure to leave a comment! Thanks for reading.