Google Authorship: How To Show Author Information in Search Results (and my Frustration With it)
This tutorial is specific to WordPress, but if you use other blogging platforms, you may be able to adapt some of the instructions. This tutorial, is intended for single-author WordPress blogs. References will be given for multiple-author blogs and for Guest bloggers.
Several months ago, Google started including authors profile in Search Results by highlighting authors in SERPs. This means that you see the author´s picture and information displaying next to a search result.
On February 27, 2012, I decided to add Google´s Authorship for my WordPress Blog, so that my information will be displayed along with search results like this:

In this tutorial, I will show you the step by step process on how I did this for WordPress, and discuss my frustration with the process. I thought that this is a straight forward simple process, until I discovered how wrong I was. I would rather be writing code now, than doing this. But I hope that this tutorial helps others along the way.
Why Google Authorship?
Some benefits to verifying your author profile with Google are:
- It helps users locate great content.
- Facial images gets attention. Your image next to a search result makes it stand out.
- Google will promote your content over stolen versions, and gives credit to owners of good content. Most Bloggers experienced finding their original content copied, often without citation.
- It helps boost your Website traffic.
There are many references and tutorials regarding displaying Author Information on Google´s Search Results, but I found that most of them tend to be confusing, and some others have the wrong information.
Here are the steps I took to establish Google Authorship for my WordPress Blog. I might have gone overboard in doing things, but I will let you decide.
Step1. Create a Google+ Profile
I already have a Google+ account, so this step was not required for me.
But for you, if you want your authorship information to appear in search results for the content you create, you need a Google Profile. This step is required. Also make sure to get a nice, good-quality photo of your face.
Step2. Update Your WordPress Author Bio
I logged-in to my WordPress dashboard, then I went to Users -› Your Profile. I scrolled down to the Biographical Info. I already have the information filled out, but I needed to update my Google+ link as shown in the image below:

Notice that I added the rel="author" attribute to the Google+ link. However, on WordPress version 3.3.1 and earlier, I noticed that WordPress strips out the rel attribute from the link. In other words, WordPress does not allow the rel="author" in the Biographical Info.
To bypass WordPress default. Here is what I did to allow the rel="author" attribute in the links included in the WordPress Biographical Info box:
I opened functions.php file located in my theme´s folder, and added the following CODE-a. Save it and upload it to the server.
<?php
/*************************************CODE-a******************************************
* @Author: Boutros AbiChedid
* @Date:   February 21, 2012
* @Description: Function that allow rel attribute in the <a> tag in the
* WordPress dashboard: User Profile -> Biographical Info.
* @Explanation: Because WP strips all rel attributes from links in the Bio Info.
* This function allows for any rel attribute's value:  e.g. allows rel="me",
* rel="author", rel="nofollow" and whatever in the <a> tag.
* By default WP strips rel attribute in dashboard: User Profile -> Biographical Info,
* for the user's profile (back-end and front-end)
* By default WP allows rel attribute in Posts and Pages.
* By default WP adds rel="external nofollow" attribute in the Comment's Website field.
* By default WP adds rel="nofollow" attribute in the Comment's text area.
* This Function does not affect the rel attribute in links in the comment's textarea.
* @File: wp-includes/kses.php (see line 400)
* @Tested on: WordPress version 3.3.1
* THIS SECTION CANNOT BE REMOVED.
**************************************************************************************/
function allow_rel_attr() {
	//Global Array used by the wp_kses library. White lists the rel attribute of
	//the <a> tag in the dashboard: User Profile -> Biographical Info.
  	global $allowedtags;
  	$allowedtags['a']['rel'] = array ();
}
//Hooks the function to a specific action. Hook is fired once WP, all plugins, and
//the theme are fully loaded and instantiated.
add_action( 'wp_loaded', 'allow_rel_attr' );
?>
Code References:
If you don´t want to add CODE-a to your functions.php file. There is another method, which is to append Google+ URL with ?rel=author. In this case, by adding it as a query parameter to the end of the URL, WordPress will not strip it. The new URL would look like this:
<!-- Another method is to add rel=author as a query parameter. -->
<a href="https://plus.google.com/113182036475737635200?rel=author">Google+</a>
Obviously you must substitute your own Google profile URL rather than mine. And just to be clear, I did NOT try this alternative method.
Step3. Add Author Bio To Your Posts
Once you have Step2 implemented, you need to make it display at the bottom of every post you write. This was already done in my case, as you can see at the bottom of every post, I have the Author Profile box, as shown in the image below:

Most new themes have the Author Profile box built in as part of the code. If your theme does not support that, read my tutorial on How To Display the Author Profile Box in WordPress Without a Plugin.
Step4. Add a Google+ Badge or Icon to Your Blog
This step might not be required, but I did it anyway! Why? Continue Reading…
This step is probably not advisable for multi-author blogs.
I Added Google+ icon to my blog by copying and pasting a snippet of code. Make sure to follow the instructions carefully to check where to add the code. The code has 2 parts. The first part is a must in the <head> of the document (header.php file in WordPress). The other part should be placed where you want Google+ icon (or badge depending on your choice) to show. It could be in the sidebar, in the footer or even in the header.
Step5. Add Google+ Profile to "About" Page
This step might not be required, but I did it anyway! Why? Continue Reading…
This step is probably not advisable for multi-author blogs. Using individual author pages might be a better option.
This step is good for single-author blogs. These blogs usually have an about page as part of the main navigation. In this case, you can add the rel="author" to a link in your WordPress Menu Editor.
For my blog, I could not use the reference above, since I don´t use the WordPress dashboard Menu editor to create the menu. However; at the bottom of the "About" page I added a new paragraph: Feel free to socialize… as you can see in the code below.
<p>Feel free to socialize: <a href="http://www.stumbleupon.com/stumbler/boutros8/" title="Follow me on StumbleUpon. External Link…" target="_blank">StumbleUpon</a>, <a href="https://twitter.com/#!/abichedid" title="Follow me on Twitter. External Link…" target="_blank">Twitter</a>, <a rel="author" href="https://plus.google.com/113182036475737635200" title="Join me on Google+. External Link…" target="_blank">Google+</a> and <a href="http://www.linkedin.com/in/boutrosabichedid" title="Follow me on LinkedIn. External Link…" target="_blank">LinkedIn</a>.</p>
Notes About the Code Above:
The link to Google+ Profile is mine, make sure to replace this link with yours.
Note the rel="author" attribute in the link. By default WordPress does not strip it since it is part of the page.
Notice the Google+ anchor. Apparently the ´+´ at the end of the anchor is required. But I am not 100% sure.
Step6. Add Your WordPress Blog To Google+
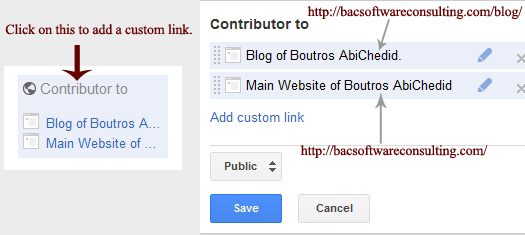
This is a required step of the verification process. Basically, I added a link back to my Blog from Google+ Profile.
To add links to Google+ Profile: I signed in to My Google+ Profile (of course yours is different). Then:
- I clicked on the Edit profile button.
- I clicked on the Contributor to section on the right.
- I clicked on the Add custom link.
- This is where I added the information of my WordPress Blog and then I clicked Save.
As you can see in the below image, I added 2 links to the Contributor to section, and the reason is that my Blog is NOT located in the root domain but in a directory. For this reason I added 2 links: To my blog and to my Main Website. This step was not very clear to me, so I did both.
Step7. Test with the Rich Snippets Testing Tool
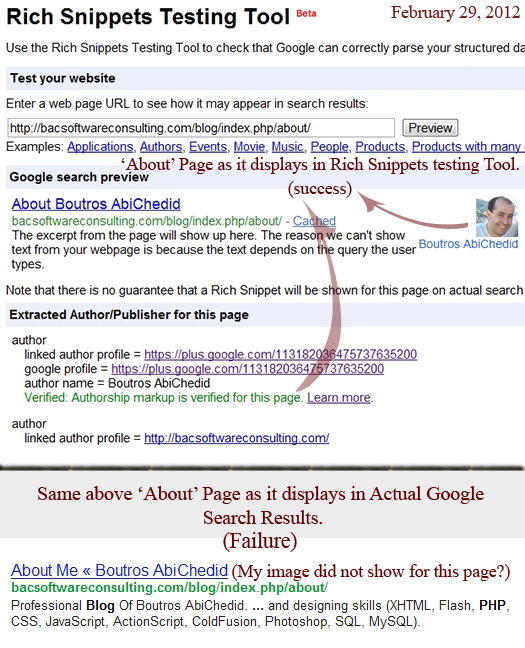
Once I have implemented the above Steps (Step1 through Step6), I used Google’s Rich Snippets Testing Tool to confirm that what I have done actually works. This is where my frustration began.
The Rich Snippets Testing Tool checks the markup to make sure that Google can extract the page information. The tool displays the markup found on a specific Web page, as well as a preview of how that page might appear in Google search results. The tool only looks at a single page. Therefore, I checked for pages and posts separately.
Step8. Fill out Google Form
This is a required step. And finally I completed Google Authorship request form. I did NOT get an email back but at some point it might start working! In my case it started (semi) working in about a week.
Questions…
I Run a Multiple-Author WordPress Blog, What Should I do?
The majority of WordPress blogs are run by a single author, and this tutorial is mainly intended for this group. If you are running a multiple-author blog then check Google Authorship, specifically the “Multiple-author blogs and sites” section.
For Multiple-Author WordPress Blogs, this is a 3-step linking method. The purpose is to ensure that each of the authors is able to claim their own content. For example, on blogs that accept guest posts, this method will ensure that every author who has posted an article is able to claim their content instead of the post showing up as the blog´s owner in search results. See this tutorial, scroll down to Method #2 section.
What About Guest Bloggers, What Should they do?
I found this tutorial to be helpful for guest bloggers, but I am not sure if it works or not. Scroll down to the Guest Blogger: section.
You did NOT use the rel="me" Attribute, Why Not?
You are right. I did not use it. I did NOT know where to add it. I suspect that the rel="me" attribute is essential for multiple-author WordPress blogs, or for single-author blogs that accept guest bloggers. Since my Google+ image and Information start showing up along my posts in Google Search Results, I did not care anymore about the rel="me" attribute value.
My Frustration With the Process
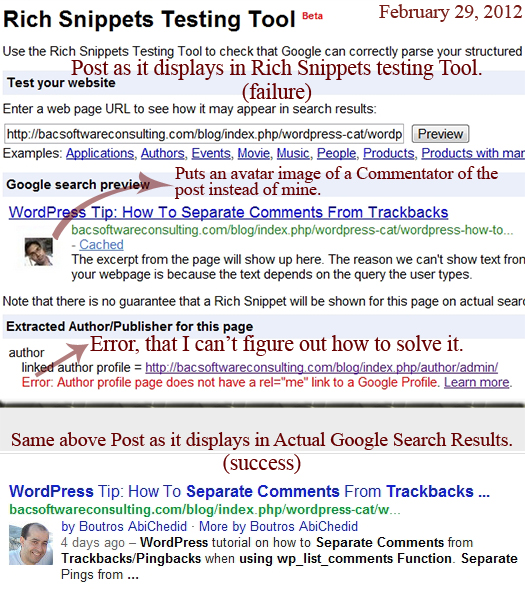
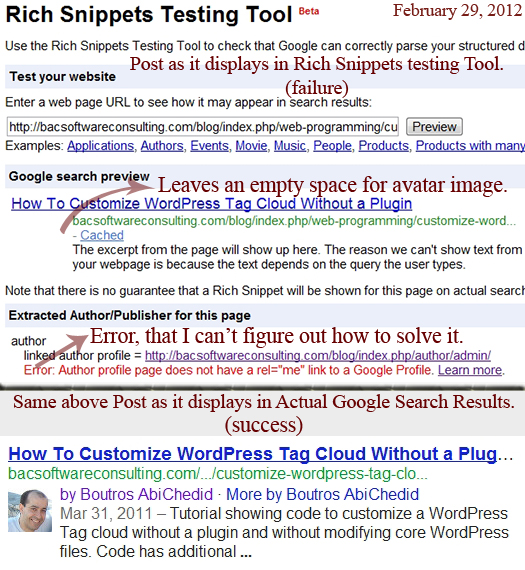
My frustration lies with the error in the Rich Snippet tool that I was getting: Error: Author profile page does not have a rel="me" link to a Google Profile. I spent hours trying to solve it without any success, as shown in the images below. I kept trying and adding more steps to the process in order to eliminate this Error.
To my surprise, about few days later (on March 3, 2012) my Google+ image and information start showing up in actual search pages, but at the same time I was still getting the error in the Rich Snippets Testing Tool for the same posts. So I suspected that in time Google will get the data needed to show my profile properly in actual Search Results.
The Error: Author profile page does not have a rel="me" link to a Google Profile. message seems erratic to me. That´s why if you believe you did all the steps correctly, I would just ignore this error and wait couple of weeks (in my case it was only about a week) and see if your Authorship profile start showing up in Google Search Results.
Check the Images Below:
1. My Blog´s "About" page: SUCCESS in Rich Snippets Testing Tool and FAILURE in actual Google Search Results. Image taken on Feb. 29, 2012.
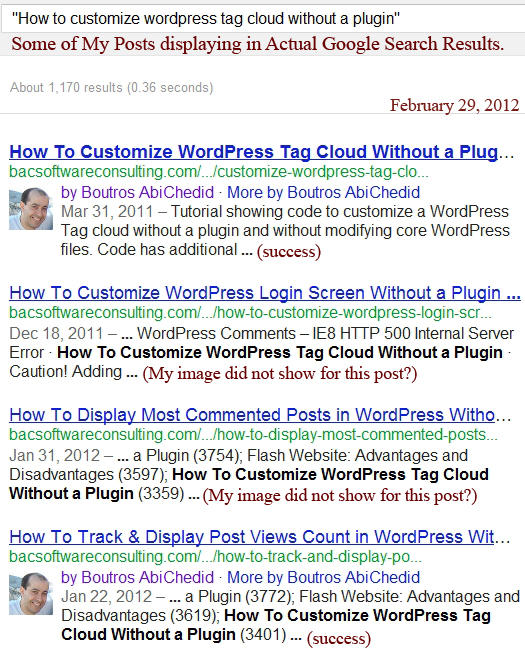
2. Google Search Results: My Google+ Image/Info shows up in some posts but NOT others. Image taken on Feb. 29, 2012.
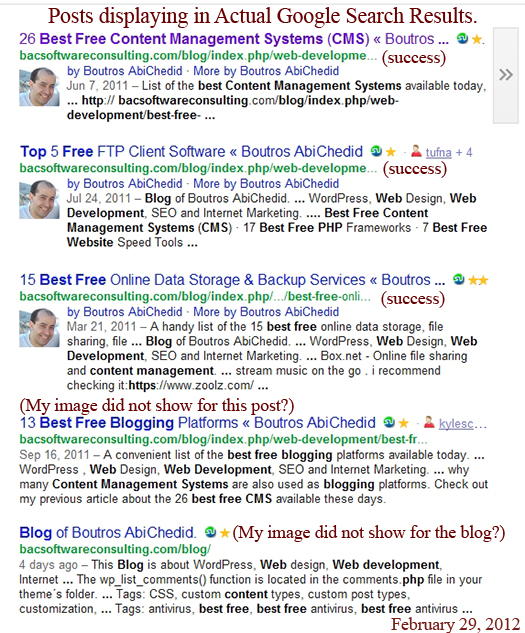
3. Google Search Results: My Google+ Image/Info shows up in some posts but NOT others. Image taken on Feb. 29, 2012.
4. Post: FAILURE in Rich Snippets Testing Tool and SUCCESS in actual Google Search Results. Image taken on Feb. 29, 2012.
5. Another Post: FAILURE in Rich Snippets Testing Tool and SUCCESS in actual Google Search Results. Image taken on Feb. 29, 2012.
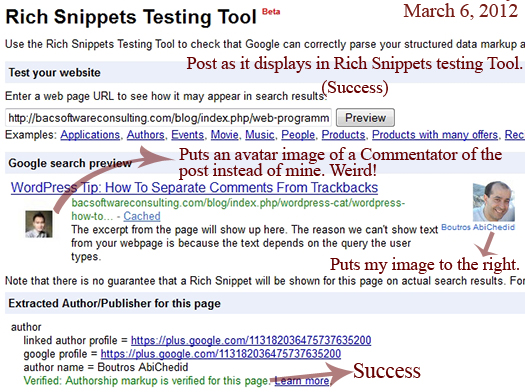
UPDATE: As of March 6, 2012, I noticed that the error that I was getting back on February 29, 2012 for some posts has disappeared in the Rich Snippets Testing Tool as you can see in the image below. This confirms my suspicion not to spend the hours of frustration that I went through. The error went away on its own.
Where did I Fail?
Also on March 6, 2012, a week after I implemented the Google authorship for my Blog, I realized that my image also shows up for the guest posts published on my Blog. This confirms that the steps I did, did not take into consideration for guest bloggers. This is probably where the rel="me" attribute value should be taken into consideration.
For WordPress version 3.2 and Newer
Starting with WordPress version 3.2 and higher, the rel=“author” attribute is already added as part of the core WordPress code for each Post’s author link. Usually the Author link appears at the bottom of every post. For instance my author appears at the bottom of every post and looks like this:
//author link that appears at the bottom of every post.
<a rel="author" title="Posts by Boutros AbiChedid" href="http://bacsoftwareconsulting.com/blog/index.php/author/admin/">Boutros AbiChedid</a>
The function that is responsible for the above code is the_author_posts_link().
Your Turn to Talk
In this tutorial, I showed you the steps I took to display my Google+ author information in Search Results. The steps I took are specifically meant for single-author WordPress blogs. But I listed references for multi-author blogs and for Guest bloggers.
The rel="author" attribute value, easily identifies your content in SERPs. it helps in boosting your blog´s traffic, and protects your content from plagiarism.
If you have something to add, a question to ask, or would like to share your experience, please share it in the comments section. Your opinion matters, unless it is a Spam.


Thanks for this ueful information, you saved me lots of time.
I’ve been doing this from a tutorial written by my friend.
What I do is step 1, step 5 (but rel that I add is “me” instead of “author”), and step 6. After that I added the Link Relationship (XFN) on the menu “About” to “author”.
When I tried to check on Rich Snippets Testing Tool, seemed to work.
The way I did above is to apply the single-author blog.
If you want to see the tutorial, you can check on http://majuter.us/2012/01/24/cara-mengaplikasikan-google-rich-snippet-ke-dalam-wordpress and http://majuter.us/2012/01/26/update-mengaplikasikan-google-rich-snippets-ke-dalam-wordpress-versi-mudah
By the way, the last image, the search results that appear on your blog is my avatar image, it’s weird.
Thanks Faisal for your feedback.
About Step6, I could not do the (XFN) since the menu is not built in the dashboard in my case.
As for your avatar image, you commented on that post, that’s why your image shows in Rich Snippets tool, but in actual Search Results
it shows properly (my image). I am just saying how the process can be very frustrating if you try to solve the errors that you get in Rich Snippets tool,
sometime it is better to walk away and give it time.
Thanks for the Links (Indonesian language? which I don’t speak), but hopefully the link help others.
Boutros.