Creating a Custom 404 Page for your Website
What is 404?
The 404 or “Not Found” is the error message displayed whenever someone requests a Web page that is not available on your Website. The 404 message is an HTTP standard response code indicating that although the client could communicate to the server, the server could not find what was requested. As there is no Web page to display, the Web server sends a generic page that says “Not found”. More from Wikipedia.
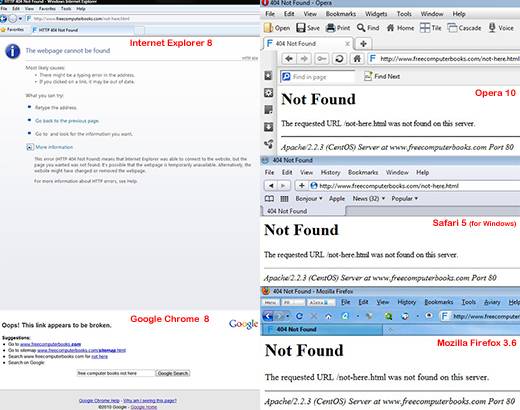
The default 404 page as displayed by the 5 major browsers is shown below.

As you can see from the above image, the generic 404 message is not friendly, not professional and unlikely to result in further exploring your Website. It does not provide any information why the user was shown the 404 page and it fails to match with the feel and look of your Website.
List of HTTP Response Status Codes
When you visit a Web page, your browser requests the data from the server through HTTP. The HTTP protocol is designed to enable communications between browsers and servers. The server returns a response message to the browser. The response contains completion status information about the request. A standard response for a successful HTTP request is a 200 OK. This is the list of HTTP status codes from Wikipedia.
Two essential steps are needed for your 404 page:
- Creating your custom 404 page.
- Configuring the server to display your page.
Step One: Creating your Custom 404 Page
Since a Generic 404 message can be frustrating to the user, it is better to create a custom page. This makes it easier for your vistors to find the information they need, and makes it less likely that they will leave your Website. A custom 404 page is an added advantage to your Website. It shows professionalism and that you care about your visitors.
Qualities of a Good Custom 404 Page
A good custom 404 page directs the visitor out of the 404 box. This means:
- having the same look and feel as the rest of your Website.
- having a clear message.
- Telling the visitor what possibly went wrong.
- Including the same navigation menu like the rest of your Website.
- Avoiding auto redirection to other pages.
- You don´t want search engine´s robots to index or archive your custom 404 page. Otherwise; it might be included in search engine results. To do that, include the following meta tag within the
<head></head>tag of your custom 404 page:
<meta name="robots" content="noindex, noarchive" />
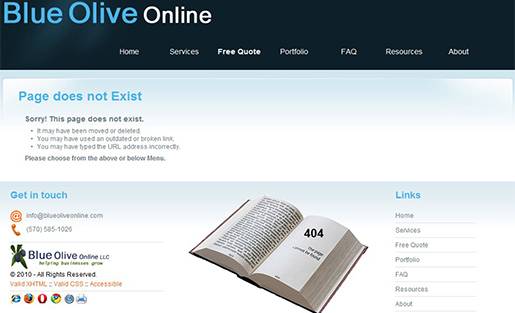
Below is my company´s custom error page. While you´re there, take a look at the page source code.
Step Two: Configuring the Server
Configuring the server to use your custom 404 page depends on the server´s type hosting your Website. This article covers the following Web servers:
- Apache servers on Linux.
- Windows servers.
There are two ways to setup your custom 404 page on Linux servers. You could:
- Use the cPanel.
- or Add the
ErrorDocumentdirective in the .htaccess file.
I want to emphasize that these are general guidelines and they might not work for your specific Web server, or your Web host company might have different control panel.
Setting up your custom 404 page on Linux using cPanel
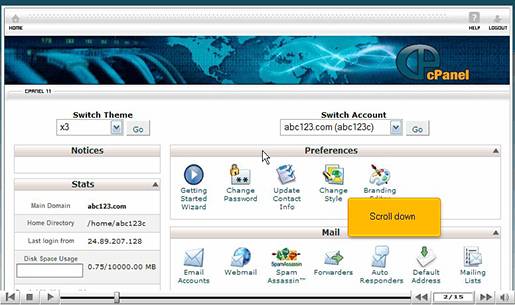
This video tutorial from Hostek shows you how to setup your custom 404 page on Linux using the cPanel. This video requires Adobe Flash player, which can be installed from here.
Tip: Just to be sure that you are getting the proper 404 response, use the following HTTP Status Codes Checker tool.
Setting up your custom 404 page using “.htaccess” file on Linux
The .htaccess is the Apache´s directory-level configuration invisible file that allows you to manipulate the behavior of the Web server. Other Web servers handle the customization of 404 error pages differently. More from Wikipedia.
The .htaccess can contain all kinds of directives for the Apache server. To create an .htaccess file, open any text editor like Notepad or Notepad++, name it .htaccess (there is no extension).
If you already have an .htaccess file on your server, download it to your computer and open it with your favorite text editor.
Now open or create your .htaccess file and type the following directive:
#ErrorDocument directive, followed by the HTTP response code and a relative URL.
#The URL begins with a slash (/) for local Web-paths (relative to Root folder).
#This method has the advantage that robots will receive the 404 status response.
#Replace the file “name/extension” with your custom 404 file.

ErrorDocument 404 /doesnotexist.html
The above code will return the 404 Not found response from the server.
You might be tempted to type in the following code:
#ErrorDocument directive, followed by the HTTP response code and the full URL path.
#Replace “yourdomain” with your domain name.

ErrorDocument 404 http://www.yourdomain.com/doesnotexist.html
The above code will cause the Web server to issue a redirect to another page. Also robots will receive the status 200 OK response from the server rather than the 404 Not found response.
Once you are done with your changes, upload the .htaccess to the root directory of your Website.
Tip: Since your custom 404 page might be served up from any subdirectory of your Website, make sure that all links in your custom 404 page are defined absolutely. Use
href = “/index.html”orhref = “http://www.yourdomain.com/index.html”to link back to your homepage instead of relatively likehref = “../index.html”orhref = “index.html”.
Setting up your custom 404 page on Windows Servers using Helm Control Panel
If your Website is running on a Windows server, there is only one way to setup your custom 404 page which is from your Web host control panel.
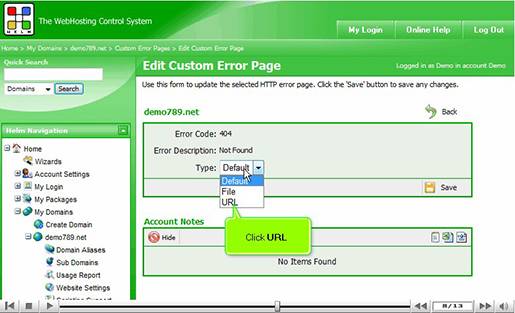
This video tutorial from Hostek shows you how to setup your custom 404 page on Windows servers using Helm. This video requires Adobe Flash player, which can be installed from here.
Tip: In order for the server to return the proper 404 Not found response code:
- For dynamic pages, use the URL option.
- For static pages, use the File option
Just to be sure that you are getting the proper 404 Not found response, use the following HTTP Status Codes Checker tool.
Step Three: Test and Test again
Now test your custom 404 page by typing a URL that you know does not exist and see if your custom 404 page is displayed. Also check that all links in your custom 404 page are valid, including any images. Finally use this HTTP Status Code tool to make sure that you get the correct header response.
Common Mistakes with a 404 Custom Page
- Writing the wrong path or filename in the .htaccess file.
- Using relative paths in the 404 custom page instead of absolute paths.
- Getting from your custom 404 page the 200 OK response instead of the 404 Not found response. This is known as soft 404.
Soft 404?
Soft 404S are actually “Not Found” errors returned by a Web server as a standard Web page with a 200 OK response. There are two kinds of 404 responses: “hard 404” and “soft 404”. Google discourages the use of “soft 404s” because they can be a confusing experience for users and search engines. Instead of returning a 404 response code for a non-existent URL, Websites that serve “soft 404s” return a 200 OK response code. The content of the 200 OK response is often the homepage of the Website, or an error page. More from Google.
The proper behavior for an error page is to return a 404 response code.
References
- HTTP Status Codes Checker
- Apache HTTP Server – Directive Index
- Hypertext Transfer Protocol (HTTP)
- HTTP 404
- Crawl Errors now reports soft 404s
- HTTP status codes
- How to Keep Your Page from Being Cached
- How to Prevent Search Engines from Indexing Specific Pages
- How to Use the the nofollow Attribute
- About rel=nofollow
- Crawl Errors now reports soft 404s
If you reached that far and liked this post, consider linking back to it. Thanks!


